Organizing Listings With Categories and Tags/Amenities
Categories provide a helpful way to group related listings and quickly tell visitors what a listing is about. Categories make it easier for people to find your content. Categories are similar to but broader than tags. Both have their place in the filtering area inside the search results page, and both have support for icons with slightly different styling.
Managing Categories
Categories are enabled by default under the Listings → Categories menu section.
They might be considered essential to be used, as they provide the first level of organization. We recommend you add no more than two categories per the listing; too many categories can be confusing or overwhelming to your visitors.
Managing Tags/Amenities
Tags are something optional and might not be needed for any kind of listings organization. In order to add support for them, you need to use the Job Tags plugin.
Tags can be used to fine-grain your listings filtering — they can be like Pets Friendly, Wireless Internet, or you can get creative and set a price range like $$$.
Step 1 – Install the Job Tags plugin
You must first purchase, install and activate the Job Tags plugin.
Step 2 – Create the tags
Now that you installed the plugin, you can go to the Listings → Listing Tags area and start adding your tags. You can add an icon for each element by hovering the first gray block at the bottom side of the page. When the Select icon button appears, click it and select the icon you’d like to use.
Step 3 – Assign the tags to listings
Once you add some tags to your listings, you’re ready to display them. To do that, you need to add a new widget to your single listings.
- Open a listing and click the Customize Listings Layout button from the top admin bar;
- Click the area that you’d like to add the tags to (eg. Listing » Content);
- Click the Add a Widget button. Select the Listing » Tag widget;
- Save the changes.
Managing Types
The listing type is used to aggregate the listings under their specific type for better control. A fact is that the types are not considered as a hierarchy, like the categories — How to Add a Job Type in WP Job Manager.
In other words, they are just another level of the organization like Categories or Tags. Therefore, we do not currently use them in the frontend or for filtering.
Using Icons
Both for categories and tags, you can add a related icon which, in categories case, will be used on listing cards and pins. Following the installation and activation of the recommended Category Icon plugin, you can manage them from Listings → Categories/Tags → Edit → Icon.
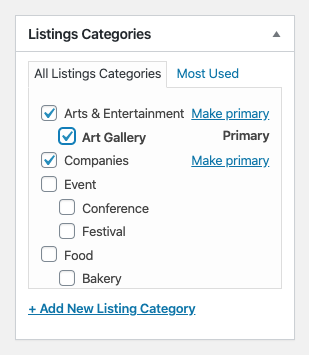
If a listing is assigned to more categories, the map will display the first one in alphabetical order. If you want to control that and decide which Category icon to be displayed on the map, you can use the “Primary Category” option from the Yoast Seo plugin.
Finding Icons
We’re offering, by default, a list of icons that you can load, but you can find many great free icon packs here, here, and here. Whenever possible, we recommend using the SVG file type to beautifully scale and style according to the area where they are shown (in some places, they are small, in others more significant).