
At the same time, photos are the most resource-demanding type of content you could publish online and the top reason for slow websites. Keeping your website below an industry average of 1.88 MB is challenging, considering how many images you might need on a page and how big a photo can get.
If you want your audience to have a nicer experience when interacting with your photos online, I’ve lined up some tips that might point you in the right direction.
First of all, what is image compression and downscaling?
Almost every time you modify an image it gets saved in a compressed file format. A few popular examples are JPEG, GIF, TIFF, and PNG.
Compression is a lossy way of shrinking the file size of an image. It takes similar-looking bits of it and mushes them together in a way it thinks you won’t notice, and it may also reduce the number of colors in your image.
Higher compression usually results in lower quality. This can be seen when you edit a photo taken in high quality (namely in a Raw format), save the edited one in JPEG format, and the file you get is a lot smaller than the original, therefore losing some of the original details.
Downscaling means making your image smaller by lowering its resolution. This also reduces detail but in a more predictable way.
When you downscale an image, all the information gets crammed into fewer pixels, and since they have to share that space, they get merged together, losing some detail in the process.
Why does the file size need to be as small as possible? Because larger files take more time to load. People don’t like waiting 10 seconds for your website to load when most others take around only two.
If you want to get more in-depth about speed and why it has become such an important topic, make sure to read Vlad’s article on website performance.
How does downscaling affect file size?
Downscaling is a fast way of lowering file size by lowering the resolution of an image. It’s great if you want to keep compression low in order to preserve details. Though there is a point where details become too pixelated, so you have to decide what level of detail you want to have in your image.
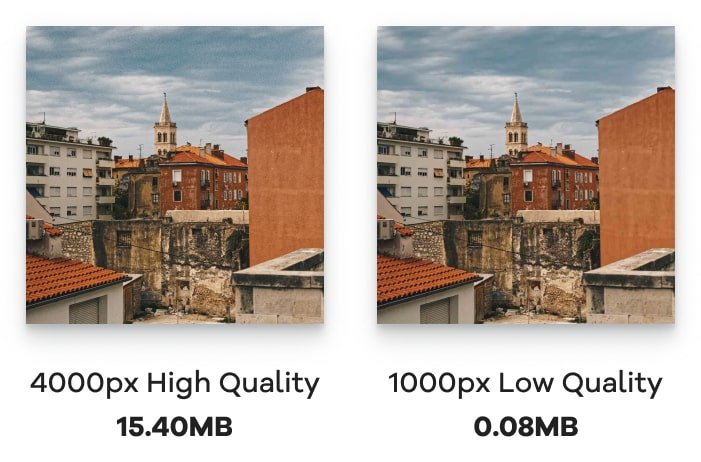
The best use case for downscaling are thumbnails, previews, or if you use small images on your website. You can clearly see the file size benefits in the comparison below.
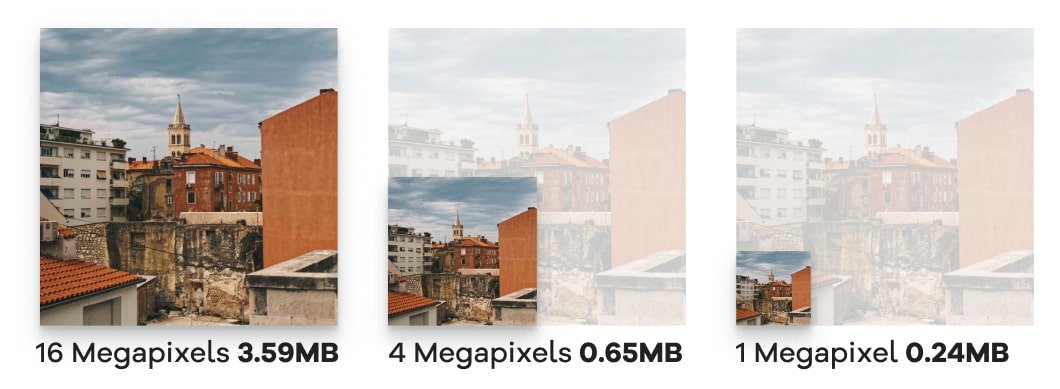
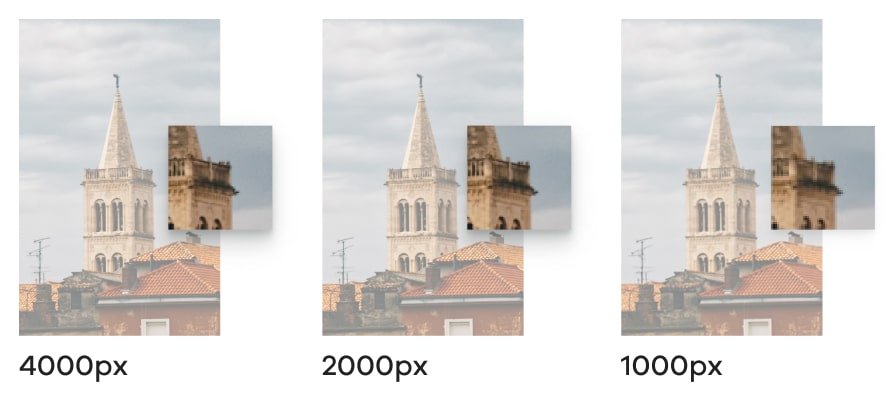
In the next example, you can see the grain pretty much disappearing when we go to 2000px, and at 1000px, you can’t distinguish the vertical lines of the railing. That’s probably the point where you know you went too far with downscaling.
Applying different compression levels on the same image
Compression seems to be the most common way to lower file size on the web, mostly because if you use it wisely, you can get it more than halfway down with little to no artifacts (the distortion of an image that happens as a side-effect of compression).
If you use small images on your site, most of the time, you can barely distinguish anything different between them.
In the images below, you can see the difference compression makes when it comes to file size. We went from 0.24 MB (or 240KB) to 0.16MB (or 160KB) on a 1000px image by going from high to medium quality without damaging the images very much.
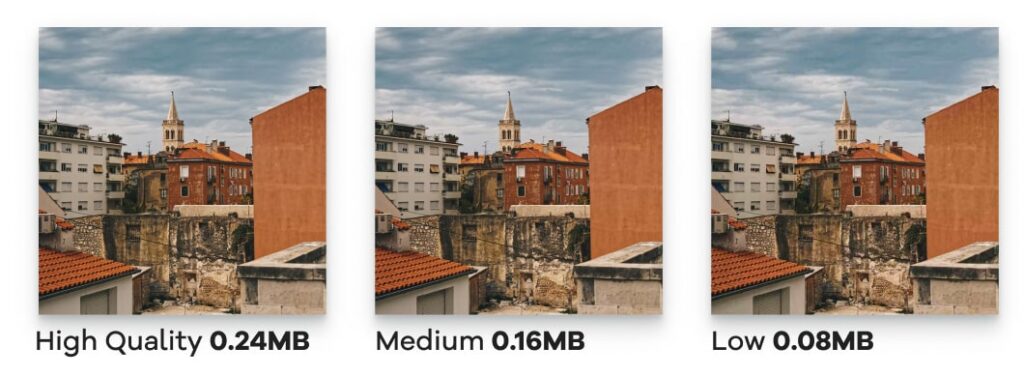
As you can see, the differences are indistinguishable since the images are not very wide, but the file size difference between them will undoubtedly impact loading speed.
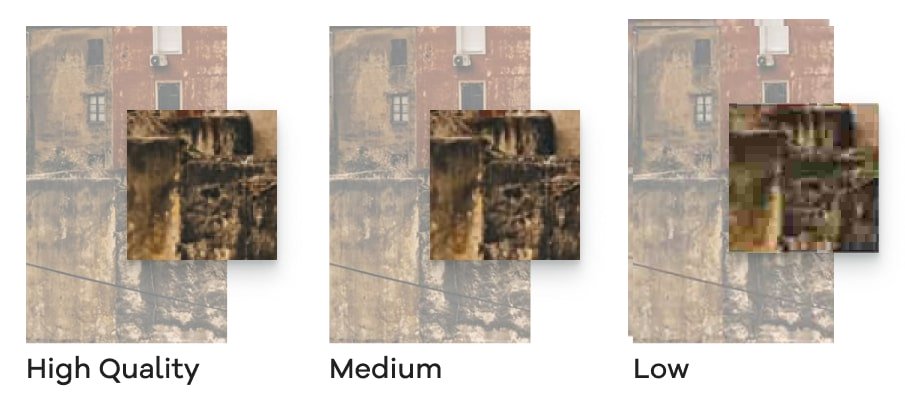
When going from medium to low quality, meaning a very aggressive compression, the size went from 160KB to just 8KB, but you can see how blocky the image gets; you can barely make out the walls’ texture.
Best Option? Use both methods
You should actually use both; that’s the most efficient way of doing it. As a rule of thumb, you should use larger resolution, less compressed images for covers, and lower resolution, more compressed ones in the place where the images are smaller (for example, inside blog posts).
Here are the extremes again; the first one is the highest quality at the original resolution, while the second one is 1/16th the scale and highly compressed. It’s only 0.5% the file size, and you can barely tell the difference in the example below.
Why is file size so important?
If you lower the file size, your website is going to load much faster. For example, while loading the compressed file, at 0.08MB, the visitor will see it instantly, but a 15MB image on a 3G connection can take 17 seconds to load, and that’s a 18650% increase in waiting time.
In a nutshell, people won’t have the patience to wait that long to see a picture, and since the recommended website loading time is around 3 seconds, you don’t want a single image to slow you down.
If you want to test your website’s performance, use Google’s PageSpeed Insights tool, and see where you stand.
What tools should I use to reduce file size?
In a pinch, I usually use and recommend these web tools to compress images quickly: compressjpeg.com & compresspng.com.
They work fast and you can upload multiple images at once and have a simple slider-based quality setting with a nifty preview. This way, you can see what you get both in terms of image quality and file size.
Other than those, I usually try to save my image at the file size and compression I want straight from the source, which is usually Lightroom, Photoshop, or Figma. They all have different ways in which you can save your image, but if you’re in a rush, their default settings are usually good enough for most purposes.
If you are not sure what type of images you should upload (e.g., .jpg, .png, .svg, .gif, etc.), I recommend checking out this article about image formats for the web.
If you can’t be bothered to do that yourself for every image, you can always use something like imagify.io, a WordPress plugin that does all that stuff right when you upload an image to your site. It’s the easiest way to go about optimizing images for WordPress, really.
To learn more about this, check out Vlad’s article on the first steps to take if you want to dabble with performance improvements straight from the source, your hosting provider.
Want to learn more about web performance? 🚀
Download our free eBook and learn how to improve your website and make it shine.


Start the conversation