How to create a one-page website
One-page websites are often the right choice when you’re looking for a fast and straightforward solution to present the information. All the content is divided into sections directly on your homepage. With the help of a navigation menu, visitors are able to jump directly to the area they are interested in.
What is a one-page website?
A one-page website is nothing more than a single page site that hosts all the essential information. If, for example, on a regular multi-page website, you would have a dedicated About page, on the one-page website, you would have a dedicated section that accomplishes the same goal.
There are numerous benefits of having a one-page website, such as:
- You can create the website faster: a one-page site does not require the same amount of content, so there’s less work.
- The information is presented in a concentrated way: people get what they are looking for fast with no need to visit different pages to find it.
- You can increase your conversion rate: having fewer distractions and comprehensive info on a single page can help users go through all the details and make decisions swiftly.
- Ideal for mobile visitors: once the page loads, they can quickly scroll through all you have to say about you or your business.
Of course, there are some downsides of going on this route:
- Ranking in search engines is going to be harder: a one-page is tougher to optimize for more than one keyword. If your offering is diverse and you want people with different interests to find you, you’re going to have a hard time getting visibility.
- Page load time can increase significantly: having all that information in one place can also mean a very long and resource-heavy page.
- Analyzing your visitors’ interests will be a challenge: with a one-page website, you have difficulties figuring out where your visitors go and what they want to learn about you.
- Incomplete details: have a single page for all your information means that you can’t go into detail, and some things will be left out, making it harder for visitors to get the full picture.
If you decide that a one-page website is what you need, keep reading to find out how you can build yours with ease.
How to create a one-page website using the WordPress Editor
All one-page websites need three elements to work: content, anchor links, and a navigation menu. Below I’ve detailed how to tackle each of these elements so that you have all the necessary info to start building everything yourself.
Step 1: Add your content using the editor blocks
The first thing you need to do is create a page and start adding blocks that meet your needs. A good place to start is by using the Hero block and the Media Card blocks found in the Nova Blocks plugin. These two alone can help you tell your story to the world.
To add a new block, all you have to do is click on the ⊕ inserter button inside the editor, click the Browse all button, and select the block you need from the Nova Blocks section.
Don’t stop there. Use the other available blocks to create a page that contains the necessary info your visitors might want to know: team members, opening hours, menus, contact information, and so on.
ℹ️ Quick tip: use the Hero block to introduce new sections on your website and create a coherent layout for your visitors.
Step 2: Set up anchor links for blocks
Once your blocks are up and running on your one-page website, you need to move to the next step and create anchor links for each section.
With the help of these jump links as others call them, you can use the navigation menu to link to a specific section on the same page (that creates the “scroll to” effect).
How to add anchor links to the Hero block
If you want the Hero block to introduce each new section you have on the page, follow the steps below to add anchor links:
- Select the Hero block that introduces your new section;
- On the right panel, click on the Advanced tab;
- Add your anchor text in the HTML Anchor section.
How to add anchor links to the Headings block
All you have to do is select the Headings block and find the HTML Anchor in the Advanced options.
Here’s an example for adding an anchor link in a blog post:
ℹ️ Quick tip: Use a single word for the anchor. If you need to use two or more words, separate them by a simple line and not with a space. If, for example, you would like to link to an About us section, the anchor text should look like this: about or about-us.
How to access your anchor links
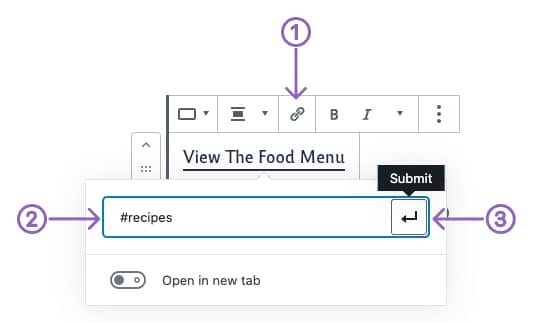
You can link to your anchors inside the page by adding the anchor in the Insert URL option, preceded by the hash symbol⟨#⟩. For example, if you used the text “recipes” as an anchor to one of your blocks, you can link directly to that section by adding #recipes in the URL area.
If you want to share the anchor link outside of your website, add the anchor at the end of the URL like this: https://example.com/#recipes. Anyone clicking that link will be directed to that specific section on the page.
Step 3: Add the anchor links to the navigation menu
The last step of creating a one-page website is to create a menu that links to the anchors. Fortunately, this is a straightforward process.
- Go to Appearance → Menus → and select the menu where you want to add the anchor links
- Click on Custom Links on the left panel and add your anchor links like this:
- In the URL tab write
#followed by your anchor text (e.g.,#about) - In the Link Text area, write the text that you want displayed for the menu item (e.g., About us). Here’s an example.
- In the URL tab write
- Click Add to Menu and repeat the process for all the anchor links you have on a page. When you’re done, click on Save Menu.