How to translate your WordPress website
WordPress comes with a lot of great benefits. One of them is the fact that it is fully translated into over 169 languages. If, for example, your website targets Spanish speakers, this can be very important.
You should know that changing the WordPress language from the Dashboard → Settings → General area is not enough. Different parts of posts, pages, menus, or widgets make up the website’s structure and all need a bit of work. The content from those sections can be added directly to your language. However, there are other text strings attached, both from the theme and plugins, that you need to manually translate.
Let’s take the following scenario: you have a food blog, and at the end of each article, you can have a Read more call to action that encourages readers to click the blog post. To facilitate access, you should translate those specific words into your native language.
Have no worries. In this article, we’re going to walk your through:
- How to translate your WordPress interface
- How to translate your WordPress theme and plugins
- How to create a multilingual website
How to translate your WordPress interface and admin screens
The good thing about using one of the most popular pieces of software to create a website is the massive community support that keeps growing. Therefore, WordPress translations are already available at the click of a few buttons.
Easy steps to translate your WordPress interface
- Go to the WordPress dashboard.
- Navigate to Settings → General.
- Under the Site Language tab, use the drop-down menu to select the language you need.
What gets translated when you switch the default WordPress language?
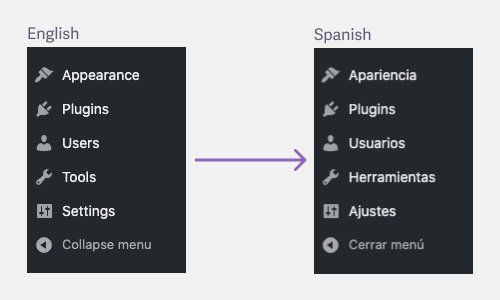
Switching the language (as in the screenshot above) means you’ll translate everything displayed in the WordPress dashboard.
As an example, we chose “Spanish” for the site language, which means “Settings” will now display as “Ajustes.” The same goes for other areas of the dashboard.
Note that translating your WordPress interface does not influence the content that you write in posts or pages. Almost everything your visitors will see on will stay the same.
There are a few exceptions of dynamic strings that come from themes and plugins, like the blog posts date (screenshot) and part of the blog posts comments section (screenshot), that needs a few more steps to change. Find out how below.
How to translate your WordPress theme and plugins
WordPress themes are responsible for most of what visitors see on the website. The good thing is a big part of what’s displayed is fully editable within the Wordpress interface: the content on a page, blog posts content, page name, and so on.
Therefore, a great deal of translation is done by default when building pages and posts. For example, naming the “About” page “Acerca” is a step towards a translated website.
Except for the areas where you control the content 100%, there are others built in the theme that might not be directly editable. Some examples are:
- the search text and placeholders (example 1, example 2).
- the “read more” links below blog posts.
- titles for various taxonomy like categories or tags (example).
When it comes to WordPress plugins, it all depends on the plugin you’re using and its impact on the live website — what the plugin displays publicly to your audience.
For example, image optimization plugins are for your use and don’t display information to visitors. On the other hand, e-commerce plugins like WooCommerce generate digital stores on your website, which means a lot of information becomes visible to those visiting.
Some plugins can have translations already available, while others need one from scratch. In the case of WooCommerce, and due to their popularity and community support, there are a lot already available (you can find them here).
1. Choose a translation plugin
The best option is to choose a trustworthy translation plugin. Our recommendation is TranslatePress because it:
- has an easy to use live preview editor to see your changes instantly;
- allows translating anything on your website like themes, plugins, pages, posts, categories, tags and more, all within the same interface;
- follows all the SEO principles so your translated pages will be able to rank in search engines;
- offers automatic translations using Google Translate to get a head start.
2. Install the translation plugin
- From the WordPress dashboard navigate to Plugins → Add new.
- Search for TranslatePress→ Click Install Now and then Activate.
- Upon activation, you need to go to Settings → TranslatePress to customize the plugin settings.
3. Translate your entire website
- From the WordPress dashboard, navigate to Settings → Translate Press → General.
- In the tab that shows up, change the Default Language to the one you need.
- Leave the All Languages tab as is. This tab is useful when you want to add a second language between which visitors can easily switch. If that’s the case, skip to the part about creating a multilingual website.
- Scroll down to the Language Switcher settings and uncheck the Floating language selection option to hide the language switcher.
Next, proceed with translating the content:
- Navigate to a page where you have elements who need translation and click the Translate site button in the WordPress admin bar (screenshot)
- Hover over those elements and add the translations as in the video below.
Once you translate a particular string (e.g., the “Next” text from the top menu), all similar strings will benefit from it. Plus, TranslatePress can translate all areas of a website, no matter if a text comes from a plugin or a WordPress theme.
Bonus tip: when it comes to strings that contain HTML, our recommendation is to copy-paste the non-translated version and replace the text while leaving the HTML intact.
Note: if you want to unlock more options from the TranslatePress plugin, you can go PRO.
How to create a multilingual website
Having a multilingual website means that your website is available in more than one language between which visitors can easily switch.
It’s good to know that doing this involves a bit of effort, but many great perks make it pay off. Among them are:
- Expand your reach – whether you blog or sell something online, a new language opens the door to other people who wouldn’t otherwise be able to read your content.
- Improve your SEO – people tend to search in their native language, so you can seize this opportunity to rank for keywords that your competitors don’t target.
- Increase the number of customers – since people won’t have trouble understanding what you’re selling, you can increase the number of sales from other countries.
- Get more people through the door – a good example is a restaurant based in a popular vacation spot where people from all over the world come to visit. Or a business that targets people from a country with more than one official language; for example, Switzerland has four official languages: German, French, Italian, and Romansh.
If your website can be a good source of information for users who speak different languages, it’s a loss not to make it accessible to them. If you invest a lot of time and energy to write valuable content, you should try to make it as available as possible.
WordPress is benefiting from such a big community, and that makes translating a WordPress theme as easy as installing a multilingual translation plugin. These tools can help you not only install and use other languages but also to localize your translations.
1. Localize your website translations
While translations mostly focus on conveying a message or literal meaning of the original content (like-for-like copy of the original), localization means adapting to the specifics of a particular language, business, or audience.
A few good examples of localization are:
- writing a date: 07/12/1998 can suggest “12th of July” in the US and “7th of December” in Germany
- writing numbers: 1,245 means one-thousand-two-hundred-forty-five in the US and one point two-four-five in the UK
- writing about money: $20 is the standard in the US, 20$ in Europe
- following various GDPR guidelines when addressing people from Europe, and so on.
All of this localization can happen with the help of translation plugins, which allow you to edit your content and adapt it to the specifics of a country or language.
2. Make your website available in multiple languages
TranslatePress is here to help once again; just follow the steps below:
- Go back to Settings → TranslatePress → General.
- Under the All Languages tab, click on the Choose button and search for the desired language. Once you found it, click on Add.
- Scroll to the bottom of the page and click Save changes.
- Navigate to a specific website page and click on the Translate site button in the WordPress admin bar.
- Hover over the text, click the blue pencil icon and start adding translating like in the example below:
3. Create and customize the language switcher
There are several options to choose from when you want to display the language switcher. To see those options, go to Settings → TranslatePress → General.
- Native language name – here, you can control how the language names display on your website.
- If you choose No the additional language, for example “Spanish,” will show as “Spanish”
- If you choose Yes it will be displayed as “Español”
- Use a subdirectory for the default language – use this option if you want your website’s primary language to have an URL. For example, if the website is in English, it will be available at example.com/en/
- Language Switcher – customize how you want to display the language switchers: with flags, short name (e.g. en for English, es for Spanish), full name, etc.
4. Add the language switcher in the menu
- Navigate to Appearance → Menus → Select the menu you want to edit.
- Click on Language Switcher and select the languages you wish to add to the menu (screenshot).
- If you want the languages to be in a submenu, you can go click on Custom Links, add “#” in the URL field, and click on Add to Menu.
Conclusion
Since most themes and plugins are in English by default, translating them is essential if you want readers to understand everything while browsing.
But besides pure translation, our recommendation is to use this translation process as a way to share a bit more of who you are with the world. This is your chance to be creative.
Who says that the “Next article” button should be translated like-for-like? Maybe there’s a fun way of naming it that can make your website truly unique and improve the browsing experience and engagement.
All of these bits and pieces of text on your website can be categorized as microcopy. The way you customize the microcopy is essential because it impacts your visitors’ experience. At the same time, it allows you to express your personality and style, so don’t be afraid to leverage it. These tidbits are a great chance to reveal who you are and what people could expect to be treated on your website.
If you are interested in learning more about how you can adapt the text on your website to match your personality, give this article a try: How the microcopy of your site impacts your visitor’s experience.