Creating the Homepage (Front Page)
With Timber, you have the flexibility of bringing your projects center stage on your homepage. All you have to do is follow the steps below and you’ll be set in no time.
Step 1 – Create a Homepage
From your WordPress Dashboard, click on Add new and name it “Home” or alike to remember it easily.
Step 2 – Change the Page Template
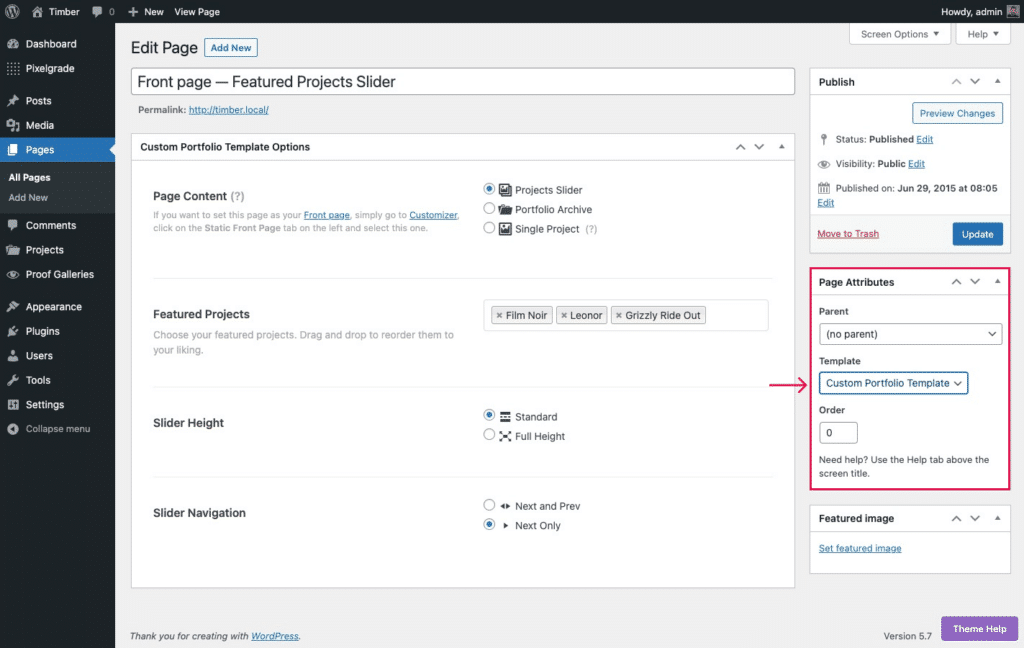
Set the Custom Portfolio Template from the Page Attributes section in the right settings panel. This will allow you to display your projects on your homepage.

Step 3 – Set the Content Source
Once you change the template, your editor will disappear (we don’t support content on these types of pages, so what’s the point of having it around, right?), and a box called Custom Portfolio Template Options will appear.
With it, you will be able to display three content types:
- Projects Slider: displays a slideshow of some projects of your choosing. You can hand-pick what projects to be featured by selecting the projects in the Featured Projects area. You’ll also be able to choose the Slider Height and Slider Navigation.
- Portfolio Archive: it features all projects you have created and contains the project title and thumbnails with AJAX loading of older projects. You have the option of choosing what projects to be excluded from being featured on the homepage.
- Single Project: as the name implies, you can select a single project to be featured on the homepage.
Step 4 – Set a Static Front Page
To finish this up, let’s put the above-created page on the front page. By default, WordPress displays the latest posts there — to change that and show your new “Home” page, follow the standard method:
- Navigate to Appearance → Customize, and click on the Homepage Settings tab on the left.
- Select the A static page option, then choose your new page from the Homepage dropdown.
- Click on the Publish button to save your static page settings.
Now your homepage can showcase your awesome projects and help you get more exposure for your work.