Adding Google Analytics to your WordPress website
If you want to make progress with your website, at some point, you will need to take a look at relevant data about your visitors. This way, you can make well-informed decisions that will bring concrete results.
Google Analytics has become the industry standard for website analytics and is one of the best solutions if you seek to understand more about your website’s traffic and audience.
Here are a few data that Google Analytics can provide to help you accomplish your goals:
- Who is visiting your website: this includes demographic and geographic data alongside information about the devices and the operating systems your visitors use. With it, you can analyze if your website is providing a good experience for people around the world and on multiple devices;
- Where people are coming from: you can see what channels drive the most traffic to your website (e.g., social media, organic search via search engines, referral links, email, etc.). Knowing this can help you understand what channels are most important for your business and where you need to make some improvements;
- What people do on your website: see what pages they visit and how much time they spend in various areas of your website;
- What are your main conversion sources: websites must accomplish specific goals, and the good thing is that Google Analytics lets you create and track different goals. You can also integrate it with a vast number of e-commerce solutions to make sense of the sources that drive downloads, clicks, purchases, and more.
Once you signed up for a Google Analytics account, you can move to the nitty-gritty and make it run on your WordPress website.
There are two ways you can install Google Analytics in WordPress – using a plugin or manually adding the code to your WordPress theme. We detailed both below, so pick the most comfortable one.
Adding Google Analytics using a plugin
Using the MonstherInsights plugin
The MonsterInsights plugin is a great way to link your Google Analytics account to your WordPress website. This suggestion comes on an unbiased foundation, and it is based only on the fact that we tested and we’re happy with how the things worked out.
Step 1 – Install the plugin
- Log in into your Dashboard, go to Plugins and click on Add new;
- Type the name of the plugin, MonsterInsights, directly in the search box from the top right corner;
- Once you found it click on Install Now and then on Activate.
Step 2 – Connect the plugin to your analytics account
You can do that by following these steps:
- Click on Insights → Settings from your WordPress Dashboard menu;
- Under the Google Authentication tab, click on the Connect MonsterInsights button;
- Select your Gmail account and click on the Allow to give access to your Google Analytics data;
- Choose the website profile that will display in the plugin.
If you need more detailed instructions, you can check out this article that explains the step-by-step process of installing and activating MonsterInsights on your WordPress website. It comes with a dedicated video and many screenshots to make sure you make a consistent setup and start on the right foot.
Using the Insert Headers and Footers plugin
This method requires a plugin that allows you to add custom code to your website’s header and footer without having to worry about overwriting the code when you update your WordPress theme.
Step 1 – Install the plugin
- Log in into your Dashboard, go to Plugins and click on Add new;
- Search for Insert Headers and Footers;
- Once you found it click on Install Now and then on Activate.
Step 2 – Get the Google Analytics code
- Login to your Google Analytics account and click the Admin button from the bottom left corner;
- Under the Property tab, click on Tracking Info → Tracking code;
- Below the Global Site Tag (gtag.js) section, you will find your tracking code.
Step 3 – Paste the tracking code on your website
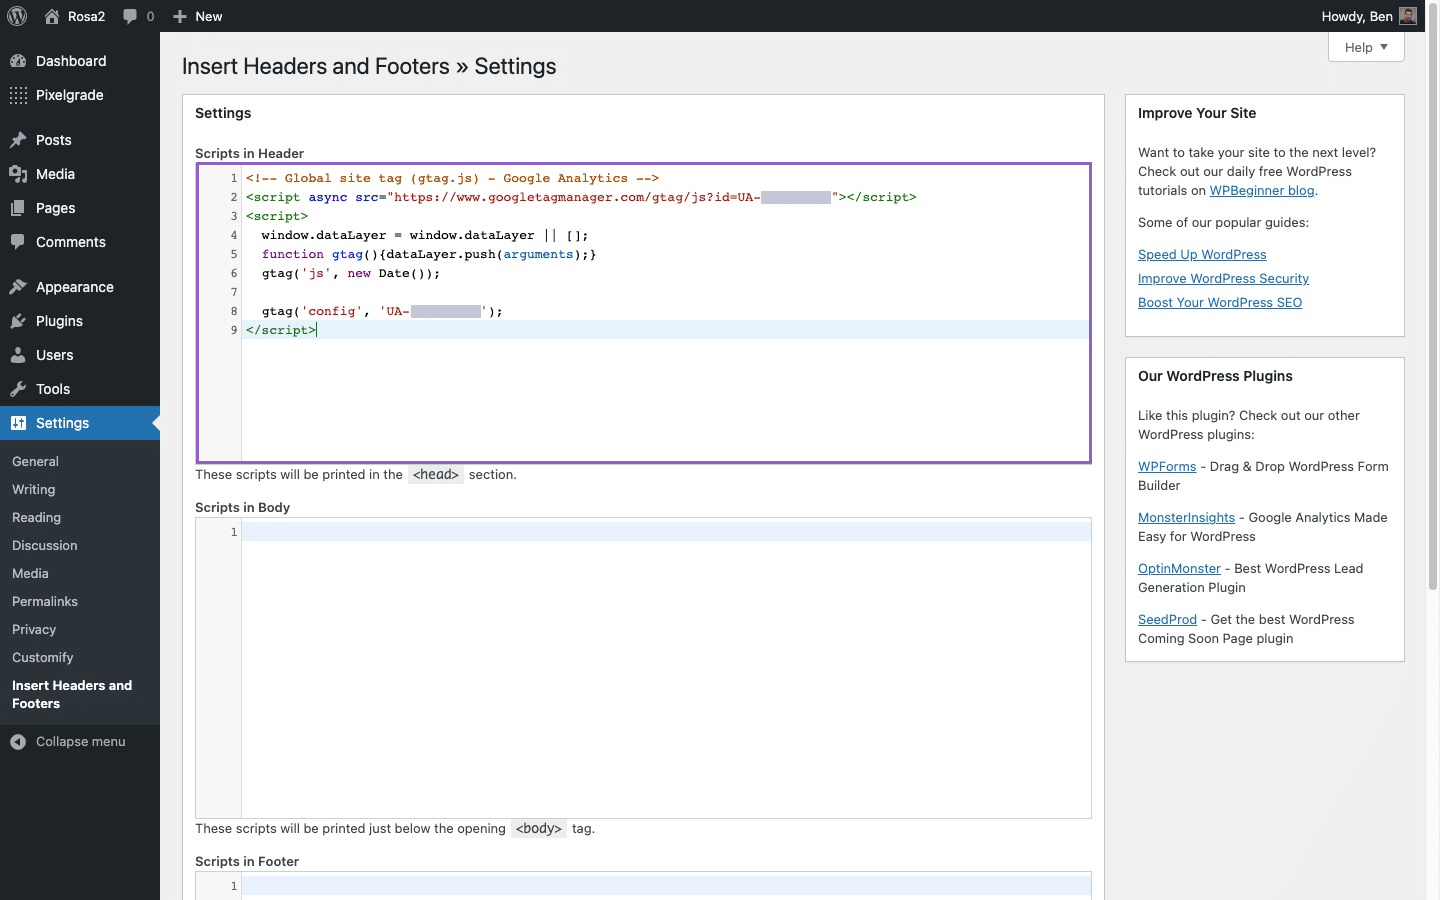
- Go to your website’s Dashboard and navigate to Settings → Insert Headers and Footers;
- Paste your code in the Scripts in Header section. See the screenshot for details;
- Scroll to the bottom of the page and hit the Save button.
That’s it. Now your website is sending information to your Google Analytics account.
Adding the code to your WordPress theme
This method is the most straightforward because you won’t rely on external plugins. At the same time, it might not be as easy as the other two, so make sure you follow the instructions carefully.
Step 1 – Install a child theme
Child themes allow you to insert custom code to your WordPress theme without losing the edits with every theme update. We wrote an in-depth article that helps you learn more about installing and using a child theme.
Step 2 – Add the code to your theme
Grab the Google Analytics code as decribed above and then navigate to Appearance → Theme editor → click on the Theme Functions option from the right panel. Scroll to the bottom and paste the code below:
<?php
add_action('wp_head', 'wpb_add_googleanalytics');
function wpb_add_googleanalytics() { ?>

// Paste your Google Analytics tracking code here

<?php } ?>
Make sure you replace the placeholder // Paste your Google Analytics tracking code here with your actual Google Analytics tracking code. The final step is to click on Update file.
Gathering data is not enough—you must make understand how it can help you grow your personal or business website. We recommend reading this article to get a grip on everything Google Analytics has to offer.