Creating Your Food Menu
What is a site for an eatery of sorts (restaurant, bakery, coffee shop) without a proper menu with all its offerings? Weird at best, annoying most of the time.
In the end, this is what you’re trying to sell and impress people with, right? It’s what defines your business and way of doing things, so please let us reinforce the importance of having a clear approach.
Osteria comes with a handy system to create and manage your menus with ease. We believe it’s a solution that saves you a lot of time, energy, and probably money.
Before diving in, you must know that the Food Menus are based on the Jetpack plugin, therefore it is mandatory to make sure you have it installed and activated. To do that, go to your WordPress Dashboard → Plugins → Add New → Search for “Jetpack” and click on Install Now. Once it installs, click on Activate. Alternatively, you can click on the Pixelgrade tab, scroll to the Manage plugins section, and install the Jetpack plugin listed there.
Adding menu items
The following steps will guide you through the process of creating a restaurant menu:
- Log in into your WordPress Dashboard
- Go to Food Menus → click on Menu Sections and start with defining your menu sections like Starters, Main Course, Dessert, Drinks. You can also group them by the time of day (e.g., Breakfast, Lunch, Dinner). Add as many sections as you like, or you can skip this step if you don’t plan on having any sections;
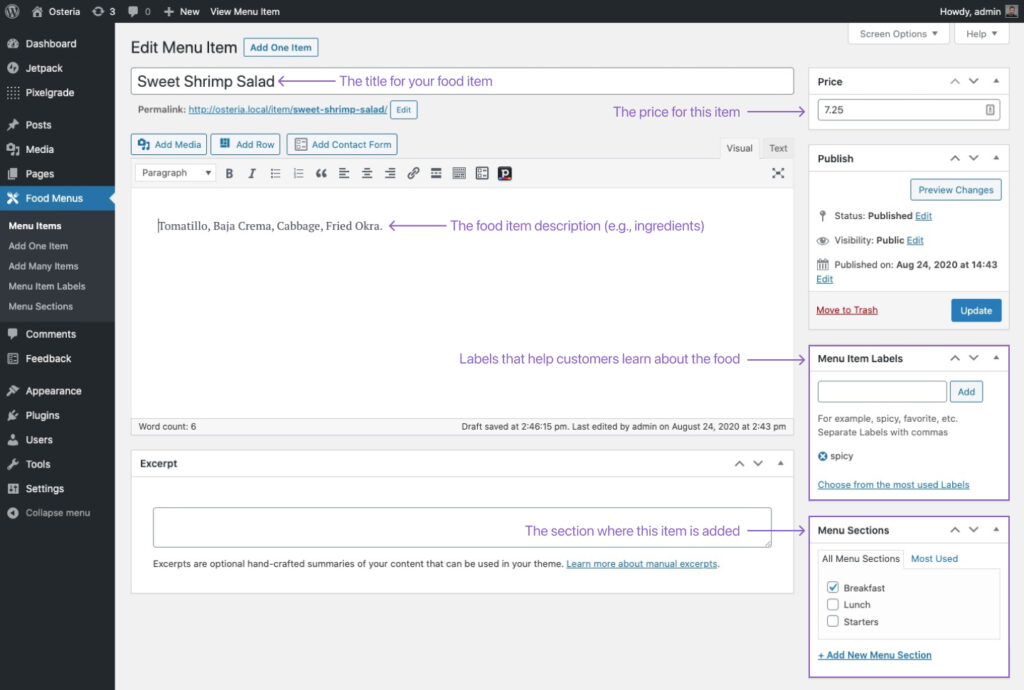
- Now it’s time to add menu items; you can go to Food Menus → Add One Item to add a single menu item or Food Menus → Add Many Items to add multiple menu items quickly—it’s up to you and the level of control you desire. Repeat this process for all your menu items.
Below is a visual representation of all the available options for each Menu Item.
Organizing your Food Menu
If you go to Food Menus → Menu Items, you will see all your sections and menu items. Here you can do two things:
1. Reorder the menu sections (e.g., Breakfast, Lunch, Dinner) by using the Up and Down options.
2. Rearrange the menu items using drag and drop.
Displaying the menu on your site
Now that you have your menu all set up, it’s time to show it to the world. There are two ways you can do it:
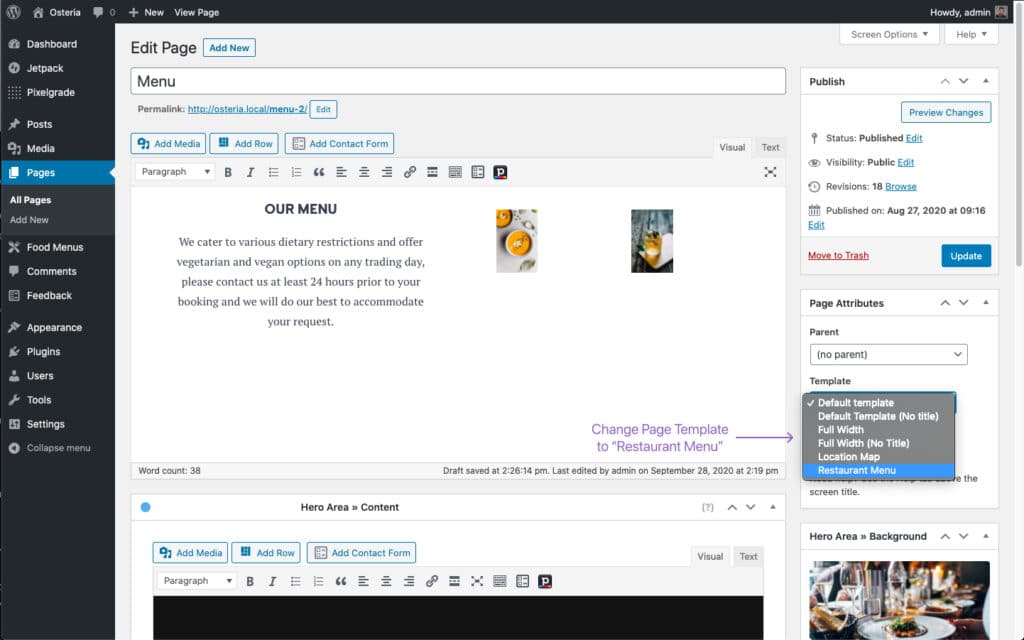
1. Using a page template
You can create a page and assign it to the Restaurant Menu page template (from the right side, in the Page Attributes box)—this way, your entire food menu will be automatically added after the page content (if there is one).
2. Using a flexible shortcode
Alternatively, you can use a shortcode and add the menu anywhere you want in your content. The shortcode is called [nova_menu]. If you add it just like that on your website, you will get the default behavior, just like you would with the first option above.
The beauty of the shortcode lies in its flexibility! The [nova_menu] shortcode supports a variety of options that will allow you to display parts of your menu (e.g., the Breakfast or Lunch section), change the styling of the menu, highlight certain menu items, and so on.
Let me walk you through each option so you can get a handle on it:
- display_sections=”true” – use this option if you would like to display the section headings (by default they are hidden);
- display_labels=”false” – use this option if you would like to hide the menu item’s labels (by default they are shown);
- display_content=”false/full” – use this option if you would like to either hide the description of each menu item or show it’s full content (by default we show the excerpt);
- featured_label=”some_label_slug” – use this option to set the label that should be used for highlighting menu items. By default, we search for the featured label, but you can choose any other label to be highlighted;
- style=”dotted” – use this option if you would like to add dots between the menu item title and the price;
- include_section=”section_slug” – use this option if you would like to only show menu items from certain sections. All you have to do is replace section_slug with the name of your section (e.g., include_section=”breakfast”);
- include_label=”label_slug” – use this option if you would like to only show menu items with certain labels. To do that, replace label_slug with one of your labels (e.g., include_label=”spicy”).
Highlighting Menu Items
Let’s face it: not all food is created equal, and some deserve more attention. Or maybe you just want to sprinkle a little bit of marketing and amplify some menu items’ visibility.
We rely on the menu item labels to know what to highlight. We will highlight all menu items with the “featured” label—so if you want to keep it simple, just add this label to whatever menu items you wish.
If, on the other hand, you want more control, with the help of the [nova_menu] shortcode, you can use any label you like as the featured label (for example, you can highlight all menu items with the label “chefs-pick”).
Moreover, you can add a text in the highlighted area of a menu item by adding a piece of text into square brackets—for example [Chef’s Selection]. Here’s a helpful video:
Here is a working shortcode with all the bells and whistles:
[nova_menu display_sections="true" style="dotted" include_section="breakfast,lunch,starters" display_labels="false" featured_label="chefs-pick"]And here’s how it’s going to look once you add it on your website:
Let’s take each item from my example and explain what we included in the demo code:
- display_sections=”true” – this means that the label for each section will show up (e.g., Breakfast, Lunch, Starters);
- style=”dotted” – these are the dots between the Menu Item Title and the price. Removing this part will remove the dots;
- include_section=”breakfast,lunch,starters” – these are the sections I chose to be displayed on the website. Removing this piece of shortcode will make the menu include all the sections you created, not just the one you selected;
- display_labels=”false” – I chose to hide the labels for each menu item (e.g., spicy, chefs pick, etc.);
- featured_label=”chefs-pick” – this is the label I chose to be featured on the menu. All menu items with this label will be highlighted. In the video above, that item was “Cornish-Mackerel.”
That’s it. Now you have a working food menu ready for the world to see.