Adding an Opening Hours System
No matter if you’re running a restaurant business, a local shop, or an office building, clear communication is always crucial. Small details such as the availability hours can make or break a dialogue between you and your future customers. To avoid misunderstandings of this kind, we created the easy-to-use Open Hours plugin, perfect for creating a schedule and keeping track of it at all times.
Setting up your Opening Hours
First, you need to get and activate the actual plugin on your WordPress website. That can be achieved by downloading it from WordPress.org directly or by searching and adding it from your Plugins Management Page in your WordPress dashboard. The plugin is called Open Hours, and you should be able to find it fairly quickly (it’s the one that says developed by pixelgrade).
After getting the plugin, you can go ahead and set up your schedule. Assuming the plugin is active, all you need to do is go to the Customizer area and click on the Open Hours option.
In there, you should see a text area where you can write your business’ opening hours in a wide range of formats, whichever you feel is easier for you. Assuming you run a company that’s open from 9 to 5, Monday through Friday, and you’re closed on Saturday and Sunday, you can enter something like:
monday to friday 9 - 17
You can pretty much choose whichever format you fit best. You don’t need to write on the days you’re closed, and we will automatically assume that the days left out are closed days.
m-w 10:15am-2am; fri 12pm-11pm;mon, tues, wednesday 1015-2; f 12:00p until 2300;mon-tu, w 10:15 A.M.-02h00; f 12:00 until 23:00;m-f 10-1210:15am-2am m-w; 12pm-11pm fri,su
You have the possibility of viewing your schedule changes in real-time in the box next to our text area. The examples above will input something similar to:
Now that you’ve setup a schedule, all that’s left is to display it on our website.
Note: To make sure your customers are as aware as possible of your operating hours, we have, along with the actual schedule, developed a way to let them know about the current status of your business. That will pick up on the program you have setup above and allow you to create an Open and Closed note to tell the world what your current availability is.
Displaying your Opening Hours
You have two possibilities of doing that, depending on your familiarity with the WordPress platform:
1. Using the “Open Hours” Widgets:
There are two widgets, and they can both be added to your website without leaving the Customizer.
You will need to go to the Appearance — Widgets — click on an area where you would like them displayed (Footer, Sidebar) -> and then hit the Add a Widget button. Searching for “Open Hours” should give you the option of selecting either of the two widgets mentioned above.
1.1 Open Hours: Overview Widget
The first widget is the Open Hours: Overview widget and displays the actual schedule. It is pretty straightforward to configure:
You can select a Title, something like “These are our operating hours”.
After choosing a title for your widget – you have a couple of options you can use there to make these hours as easy to grasp as possible:
- compress your opening hours: so if you have days with similar schedules, you display a compressed version (i.e. Monday – Friday 9 AM – 5 PM)
- hide closed days: if you believe that adds too much content to the schedule
- select a time format: that corresponds to WordPress’ supported time formats
- short day names: instead of Monday you’ll get Mon.
1.2 Open Hours: Current Status
This widget allows you to set up a status to let your customers know if you’re open or closed at the particular moment, they are visiting your website.
After enabling this widget – you have the option of setting an open note and telling your customers you’re currently open and a closed note, letting them know otherwise.
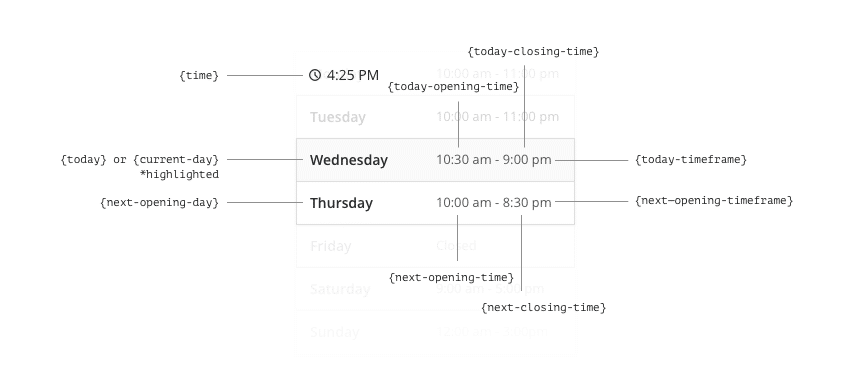
To make this a bit more fitting to your needs, we have also developed a few replacement tags you can use in your notes – that will pickup data from the schedule you’ve previously setup. For example writing “It’s {time} and we are open until {today-end-time}” will display something like “It’s 3:45pm and we are open until 5pm”.
The complete list of supported replacement tags can be seen below:
| Tag | Description |
|---|---|
| {time} | Will be replaced by the current WordPress installation time. |
| {today} | Will be replaced by the name of the current day. |
| {today-opening-time} | Will be replaced by the current day’s opening time. |
| {today-closing-time} | Will be replaced by the current day’s closing time. |
| {today-timeframe} | Will be replaced by the current day’s open-closed timeframe. |
| {next-opening-day} | Will be replaced by the next day’s (in which you will be open) name. |
| {next-opening-time} | Will be replaced by the opening time of your next open day. |
| {next-closing-time} | Will be replaced by the closing time of your next open day. |
| {next-opening-timeframe} | Will be replaced by the open-closed timeframe of your next open day. |
2. Using Shortcodes
The shortcodes will pretty much have the same output and functionality as the widgets above do, with the difference that they can be used anywhere in your content, not only in the specially designed Widget Areas.
The two shortcodes we have developed are called: [open-hours-overview] and [open-hours-current-status], and they will require some additional parameters (the ones you can also set up in the widgets) to make them work accordingly.
The overview shortcode should look something like this:[open-hours-overview title="My Business Open Hours"]
After adding this to a post’s content, for example, this shortcode will display the opening hours you have setup in a table, which will pick up the style (for tables) from your theme.
The current status shortcode requires a bit more parameters, both the *open* and *closed* notes:[open-hours-current-status open_note="We are currently open, feel free to drop by!" closed_note="We are closed now, but we will be open again on {tomorrow-start-time}"]
And you’re done – you now have an easy-to-read display of your operational hours so your customers will know precisely when they can reach you!
Available Shortcode Options
| Option | Description | Choices | Default Setting |
|---|---|---|---|
| [open-hours-overview] | |||
| title | The title of your schedule. Leave it out if you do not want a title. | Any string. I.e. “My shortcode title” | N/A |
| time_format | The time format to be used when displaying hours. For a full list of supported formats, you can refer here. | “g:i A”, “g:i:s”, etc. | “g:i A” |
| [open-hours-current-status] | |||
| title | The title of your schedule. Leave it out if you do not want a title. | Any string. I.e. “My shortcode title” | N/A |
| open_note | The note that will be displayed during your open hours. | Any string: “We are open now” | N/A |
| closed_note | The note that will be displayed during your closed hours. | Any string: “We are closed now” | N/A |
| time_format | The time format to be used when displaying hours. For a full list of supported formats, you can refer here. | “g:i A”, “g:i:s”, etc. | g:i A” |
—
All of us here at pixelgrade hope you enjoy and benefit from this plugin, and any feedback you might have is more than welcomed!