How to backup your WordPress website
Backup is essential because, with every WordPress or themes and plugins update, things might break or vulnerabilities can be exposed and leveraged by attackers. Having a full site backup that you can restore at any time is mandatory if you don’t want to lose important data or your whole website overnight.
There are several great options out there, from the WordPress almost default plugin, Jetpack, to other third-party options like WPvivid, UpdraftPlus, or BackupBuddy.
To help you get started and be on the safe side, we are going to walk you through how you can backup your WordPress website using WPvivid. We chose it because it’s one of the most straightforward and easy solutions out there and has a great free option you can use.
Step 1 – Install the WordPress backup plugin
To install it follow these instructions:
- Go to your WordPress Dashboard → Plugins → Add New and search for “WPvivid” and choose the option that looks like this.
- Click on Install Now and then on Activate
Step 2 – Manually backup your WordPress website
Now that you installed the plugin, you’ll notice a new section in your WordPress Dashboard called WPvivid Backup. To manually back up your WordPress website, follow these instructions:
- Go to the Backup and Restore tab
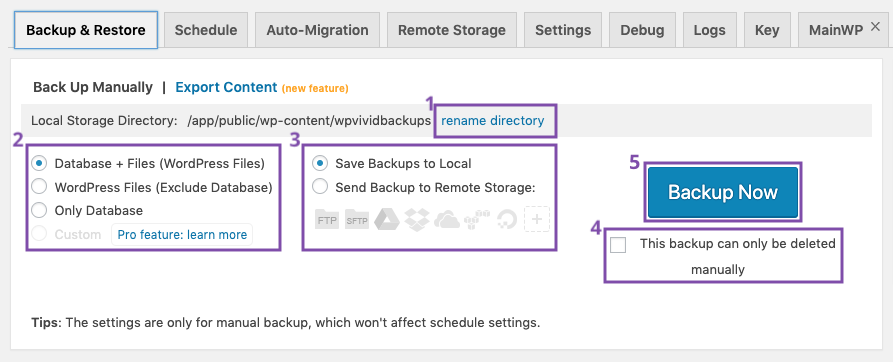
- Here you will find several options:
- Select or create a new local storage directory where the backups will be saved: this will create a new folder called “wpvividbackups” in your WordPress wp-content folder and keep the backups there.
- Choose what you want to backup from the options: Database + Files (WordPress Files), WordPress Files (Exclude Database), or Only Database. We would recommend the first one.
- Select if you want to save the backups to your web server (your hosting, where your website is stored) or if you want to use cloud storage or FTP. We would recommend cloud storage since all your files will be saved in a different location and if someone breaks in your Hosting account, your files are going to be safe.
- Click This backup can only be deleted manually if you don’t want your backup to be automatically deleted when new ones are created
- Once you are ok with the settings, you can click Backup Now.

After your first backup, you will be able to check all your backups in the Backup tab. Here you can see when they were completed, and download or restore one of them.

Step 3 – Schedule automatic backups
You don’t want to keep reminding yourself to check the dashboard and backup every once in a while. The best option is to schedule these backups at regular intervals so you’ll always be in the safe zone.
To schedule automatic backups that you need to:
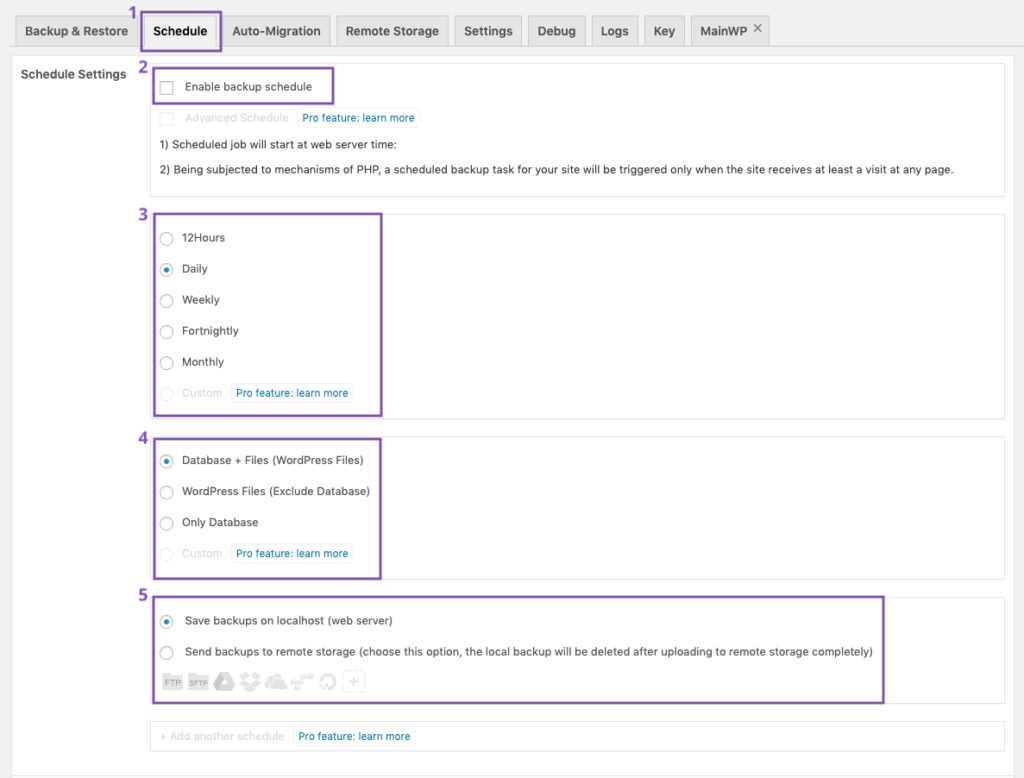
- Go to the Schedule Tab in WPvivid Backups.
- Click on Enable backup schedule.
- Select the frequency of the backups. If you have a website that is continuously updated with new blog posts, pages, and more, choose a high frequency of backup updates (like 12 hours). If your site is static, meaning new content is added at a lower rate, then you should be fine with a backup every two weeks or even every month.
- Choose what type of backup you want: Database + Files (WordPress Files), WordPress Files (Exclude Database), or Only Database.
- Select the storage location for your backups: locally on your web server (hosting) or a remote storage option.
- Click Save Changes, and that’s it.

It’s that simple. Now you won’t have to worry that something might happen to your website since you’ll always be able to restore it using a previous backup.
Looking for advanced website optimisation?
Get our Optimisation Service, and we’ll help you get a fast, secure, and performant website in no time.