How to add custom fonts to your WordPress website
Using custom fonts will help you expand the list of available fonts and use the ones that match your needs and brand. Fortunately, this functionality can be achieved easily in WordPress with the help of a plugin.
Even though this is easily achievable, you should be aware that you should keep the list of fonts used on your website to a maximum of three, preferably two.
Something to keep in mind is that all our themes directly access the entire library of fonts provided by Google. If one of the fonts you need is coming from Google, it should already be included in your theme’s available font options. If you want to learn more about changing your fonts using the existing options, read this in-depth article.
If your fonts are from a different source, then read on. We’ll now get to the nitty-gritty and required steps to use custom fonts on your WordPress website.
Step 1 – Find the right custom fonts
You can find a great selection of free fonts on Use & Modify or in the “The Definitive Guide to Free Fonts” from Typewolf. Otherwise, you can take a step further and choose paid alternatives from Fonts.com, Adobe Fonts, or Typography.com.
Regardless of the source, each font will come with different font variations (weight and style). For example, the Roboto font has variations like Roboto Thin, Roboto Light, Roboto Bold, Roboto Bold Italic, etc. Use them to customize the look of different elements of your website like headings (H1, H2, H3, etc.), body text, and more.
Step 2 – Install the custom fonts plugin
To come to your help, we created Fonto, an in-house WordPress plugin that gives you a helping hand when it comes to adding a new font to your website. Since there are plenty of possibilities to mix and match, having such a reliable tool by your side will highly facilitate the decision-making process. With Fonto, you know for sure that you use your favorite fonts in the right way on your website.
To install Fonto, navigate to Plugins → Add new → search for Fonto and click on Install (the search result looks like this). Once you activate it, you should see a new option in your WordPress dashboard called Fonts (example).
Step 3 – Add a new custom font
There are two different ways to embed a font into your website. You can publish your fonts using either an embed code through a Web Font Service or downloading a self-hosting kit and hosting the fonts on your server (aka your hosting).
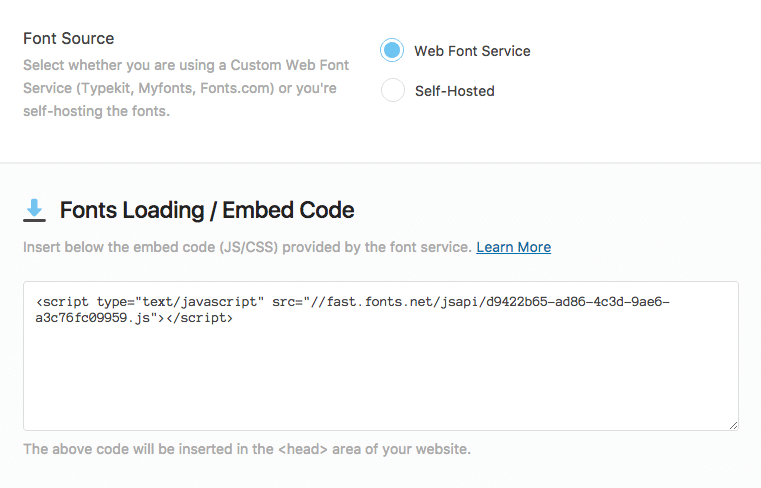
Method #1 – Web Font Service
Most of the premium type foundries give you a simple JavaScript or CSS code to insert on your website, which automatically loads the fonts.
To do that, from your WordPress Dashboard, click on Fonts → Add new → enter the name of your font → check the Web Font Service option in the Font Source area. If you’re using services like Fonts.com, Adobe Fonts, or Typography.com, copy the embed code provided with your font to the Fonts Loading / Embed Code field as it is. This ensures that the code will be automatically inserted in the <head> area of your website.
Method #2 – Self-Hosted
If you have a self-hosting kit containing your fonts in a Web font format, you can use this option to deploy your fonts directly from your server. Follow the steps below to get the font loaded:
- Download the fonts files to your computer.
- Make sure that you have all the necessary font formats to display the Web fonts in all major browsers. There should be some Web Open Font Format (.woff or .woff2) files included. If you have only the TrueType (.ttf) or OpenType (.otf) format, you can use the FontSquirrel Webfont Generator to create the font formats you need to support all the major browsers. Below is a demo video showing how to generate the .woff and .woff2 formats you need.
- From your WordPress Dashboard, click on Fonts → Add new → enter the name of your font → and check the Self-Hosted option in the Font Source area. Next, click on the Add or Upload Files button and select to upload all the fonts files that you have. Note: if you receive an error like “Sorry, this file type is not permitted for security reasons.” please follow this article for details on how to overcome this limitation.
- Insert in the Embed Code area the code received within the self-hosting kit. It should be a CSS code with some @font-face declarations like in the example below:
@font-face {
   font-family: 'Font Name';
   src: url('font-name-file.woff2') format('woff2'),
   url('font-name-file.woff') format('woff');
}- Copy the URL Path field and paste it before each URL in the Embed Code field. The example code will look like this:
@font-face {
   font-family: 'Name of the font';
   src: url('http://yourwebsite.com/wp-content/uploads/fonts/11148/name-of-the-font-file.woff2') format('woff2'),
   url('http://yourwebsite.com/wp-content/uploads/fonts/11148/name-of-the-font-file.woff') format('woff');
}
Note: To get the URL of your font, navigate to the Media tab, click on the uploaded font, and grab the URL using the Copy URL to clipboard button. Repeat the process for all font variations.
Below you will see a detailed video that follows all the steps above.
Next, you have to match the fonts variations.
Step 4 – Configure font weights & styles
Depending on the service you’re using, you should note how the fonts variations (weights and styles) are defined within the font-family CSS rule.
Case #1 – Fonts are grouped in a single “Font Family” name
When you have only one font name like “Proxima Nova”, you just need to enter the font name and only check the available variations loaded through the font package:
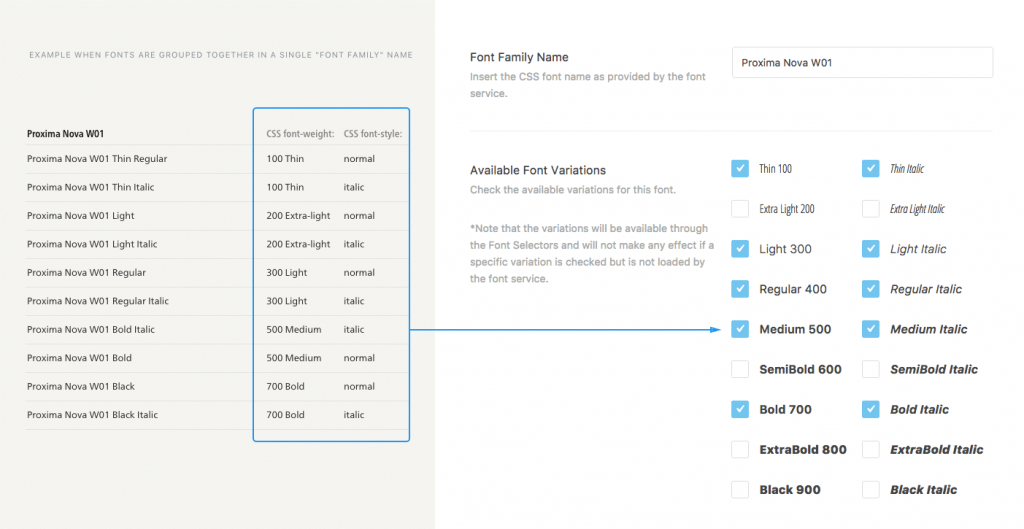
Services that are offering this option are Adobe Fonts or Fonts.com through Family Grouping option.
Case #2 – Font Names are referenced individually
When you have multiple font names like “ProximaNW01-Regular” and “ProximaNW01-RegularItalic” you need to pair the provided fonts names with their matching weights and styles. Note that there might be weights and styles that don’t have a font name available, which is totally fine as you don’t need to use all fonts variations.
Services offering this option: Fonts.com, Typography.com
Step 5 – Publish your Font
Once you finished the two steps above, hit the Publish button from the right sidebar to save the font.
Go to Appearance → Customize and wherever you have a Font Field you will see your font at the top of the list in the Custom Fonts category:
And that’s it! Your favorite fonts, up and running in a matter of minutes. 👏
Frequently used web fonts services
Most of the type foundries offer their fonts directly from their servers. All you have to do is copy the provided embed code and do the weights and styles matching. We made a few use-cases with the most popular foundries:
Fonts.com
- Firstly, you need to create an account on Fonts.com;
- Select the font you want to use for your website and assign it to a project. For some detailed instructions about how to do that, you can check this article.
- Once everything is set up, all you have to do is to select your project, select the Publish Options option and copy all the JavaScript code from Option 1: JavaScript tab.
- In your website dashboard, go to Fonts → Add New and add a name for your new font.
- Select the Web Font Service option and paste the code from point 3 inside the Fonts Loading / Embed Code area.
- Now, you have to select the Font Names are Referenced Individually option from the Weights & Styles Matching section.
- For each variation of your font, you need to add the specific name.
- Let’s have the Trajan font, for example. As you can see, we only have the Regular and Bold options. In the Publish Options panel on Fonts.com (the same one from the point 3), you can see the Reference Your Web Fonts Directly area. In this field, you have the name of the two variations of the font:
- font-family:’Trajan W01 Regular’ for the Regular font
- font-family:’Trajan W01 Bd’ for the Bold one.
- In the new fields available on Fonto, you need to add the name as it goes:
- for the Regular font, you have to use the Regular 400 field and add the name Trajan W01 Regular;
- for the Bold font, you have to use the Bold 700 field and add the name Trajan W01 Bold;
- Hit the Publish button, and that’s all.
Adobe Fonts
- Firstly, you need to create an account on fonts.adobe.com
- Select the font you want to use for your website and assign it to a project. For detailed instructions about how to do that, you can check this article.
- Go to Kit Editor.
- Click on the Embed code button and copy all the embed code.
- In your website dashboard, go to Fonts → Add New and add a name for your new font.
- Select the Web Font Service option and paste the code from point 4 inside the Fonts Loading / Embed Code area.
- Make sure that you have checked the Fonts are grouped together in a single”Font Family” name option in the Weights & Styles Matching area.
- Go back to the Kit Editor and click on Using fonts in CSS the Selectors area on the page’s left side.
- Copy the text (without commas) in the first field of the modal that appeared on the page.
- Go back to your dashboard and paste the text from point 9 in the Font Family Name field.
- Back in the Kit Editor, look at the Weights & Styles area on the left side of the page. All the available options need to be checked in the Available Font Variations area back in your dashboard.
- Once you checked all the variations, just hit the Publish button.
Typography.com
- Firstly, you need to create an account on Typography.com
- Select the font you want to use for your website and assign it to a project. For detailed instructions about how to do that, you can check this article.
- Go to the top right button where it says “Welcome, X” and click on the Cloud Dashboard area.
- Select the project that you just created.
- Click on the Tools button and copy all the code from the CSS Key field.
- In your website dashboard, go to Fonts → Add New and add a name for your new font.
- Select the Web Font Service option and paste the code from the point 5 inside the Fonts Loading / Embed Code area.
- Click on the Font Styles tab of your project and look for the font-family used for the font.
- Copy the font-family and paste it in your dashboard, on the Font Family Name field (without commas).
- Check all the variations available for the font in Typography.com and make sure that all the options in the Available Font Variations are checked.
- Hit the Publish button.